Juniper Procreate Color Palette: Streamlining Your Digital Art Workflow
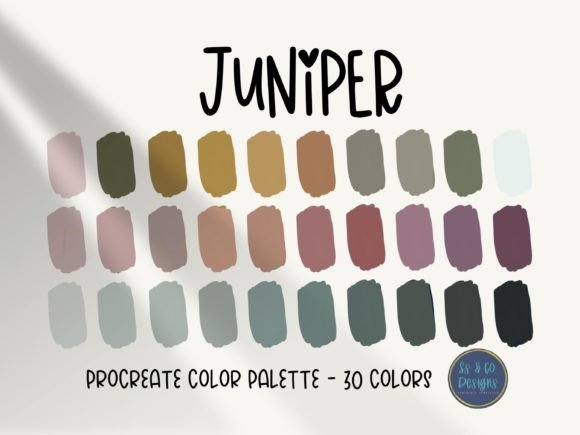
Digital illustration is as much about efficiency as it is about creativity. When you are in the flow state, the last thing you want is to fumble with color wheels or second-guess your hue selections. This is where a curated resource like the Juniper Procreate Color Palette becomes an invaluable asset for artists of all skill levels. Designed specifically for the Procreate ecosystem, this collection offers thirty beautiful, hand-selected colors that eliminate the guesswork from your design process. However, simply downloading a palette is not enough; understanding how to integrate these pre-selected tones into your workflow effectively is what separates amateur experiments from professional-grade artwork.
Understanding the Value of Curated Colors
The Juniper Procreate Color Palette is not just a random assortment of shades. It is a thoughtfully constructed system intended to save you time on your next project. By providing a limited but versatile range of tones, it forces a level of cohesion that can be difficult to achieve when picking colors individually from the full spectrum. Let the colors inspire your creation rather than overwhelming you with infinite choices. For beginners, this reduces decision fatigue. For professionals, it ensures brand consistency and visual harmony across multiple pieces.
Many creators overlook the psychological impact of a restricted palette. When you limit yourself to thirty specific colors, you are more likely to explore shading, texture, and composition because you are not distracted by hunting for the "perfect" new hue. This constraint breeds creativity, pushing you to mix and layer the available tones in innovative ways.
Common Mistakes When Using Pre-Selected Palettes
While tools like the Juniper palette are designed to help, several common misunderstandings can hinder their effectiveness. Recognizing these pitfalls early can significantly improve your final output.
Mistake 1: Treating the Palette as a Strict Rulebook
A frequent error is assuming that you must use every color in the set or that you cannot deviate from them at all. This rigid approach can make your art feel flat or forced. The palette is a foundation, not a cage. If your illustration requires a highlight that is slightly brighter than the provided options, adjust the brightness slider. The goal is harmony, not strict adherence.
Better Approach: Use the thirty colors as your base layers and mid-tones. Feel free to tweak saturation or value for highlights and shadows. This maintains the cohesive look of the Juniper aesthetic while allowing for necessary artistic adjustments.
Mistake 2: Ignoring Context and Lighting
Another oversight is applying these colors without considering the lighting environment of your piece. A color that looks vibrant in isolation may appear muddy when placed next to certain backgrounds. Users often blame the palette for poor contrast, when the issue is actually placement.
Better Approach: Before starting your detailed work, create a quick thumbnail sketch using only three to four colors from the palette. Test how they interact under different simulated lighting conditions. This small step prevents hours of rework later.
Mistake 3: Overlooking System Requirements
It sounds basic, but many users attempt to import palette files without verifying their software compatibility. Please note that you must have the Procreate app to be able to download and use this file. Trying to open these files in Photoshop, Clip Studio Paint, or other applications will result in errors or unreadable data. This leads to frustration and wasted time troubleshooting non-existent bugs.
Better Approach: Always check your app version before purchasing or downloading digital assets. Ensure your iPad and Apple Pencil are updated to support the latest features of Procreate, ensuring smooth integration of external palettes.
How to Properly Import and Organize Your Palette
Once you have acquired the Juniper Procreate Color Palette, the next step is installation. Many beginners struggle with this simple process because they are unfamiliar with the interface. For more detail about how to import palettes into Procreate Application, please go to the official procreate.art handbook under the colors and colors-palettes sections. However, here is a practical overview to get you started quickly.
- Download the palette file to your iPad’s Files app.
- Open Procreate and create a new canvas.
- Tap the color circle in the top right corner to open the color menu.
- Select the "Palettes" tab at the bottom.
- Tap the plus sign or the import button, depending on your version.
- Navigate to your Files app and select the Juniper palette file.
After importing, do not leave the palette buried in your general list. Create a dedicated folder for your favorite curated sets. This organization saves precious seconds during client projects or tight deadlines. Efficiency in digital art is cumulative; small time savings add up to significant productivity gains over a month.
Evaluating Quality and Usability
When considering any digital asset, including color palettes, it is essential to evaluate its utility beyond the initial appeal. Ask yourself: Does this palette cover a wide enough range of values? Are there enough cool and warm tones to create depth? The Juniper palette addresses these needs by offering a balanced selection that works well for both character design and environmental art.
However, usability also depends on your personal style. If you primarily work in high-contrast neon styles, a muted, earthy palette might require more adjustment. Conversely, if you specialize in soft, illustrative storytelling, these hand-selected colors will likely align perfectly with your vision. Always preview the hex codes or swatches before committing to a large project.
Maximizing Your Creative Output
To truly benefit from the Juniper Procreate Color Palette, integrate it into your daily practice. Challenge yourself to complete a study using only five colors from the set. This exercise trains your eye to see subtle differences in tone and temperature. Over time, you will develop an intuitive sense of which colors from the palette work best together, reducing your reliance on trial and error.
Remember, tools are only as good as the hands that wield them. The palette provides the ingredients, but you are the chef. By avoiding common mistakes like rigid adherence or poor lighting consideration, and by ensuring technical compatibility, you can leverage this resource to elevate your digital art. Whether you are a freelancer looking to speed up your workflow or a hobbyist seeking inspiration, letting these pre-selected colors guide your process can lead to more polished, professional, and satisfying results.
Take the time to explore the nuances of each shade. Experiment with blending modes and opacity settings to see how the colors interact digitally. The more familiar you become with the specific characteristics of the Juniper palette, the more naturally it will become part of your artistic voice. Start your next project with confidence, knowing that your color choices are backed by thoughtful design and practical utility.